這篇文章將帶您探討如何使用 Cloud Functions 實踐 Slack Slash Command,並與 Google Knowledge Graph API 做整合。
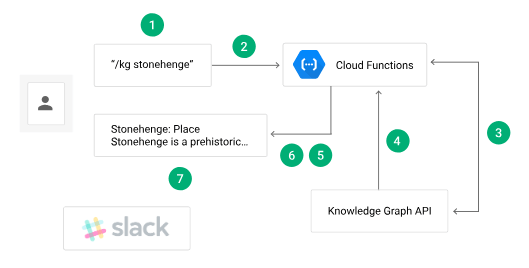
流程解說
1. 使用者在 Slack 頻道當中執行 /kg <想要搜尋的內容> Slash command
2. Slack 發送帶有 payload 的訊息至 Cloud Functions endpoint
3. Cloud Functions 發送帶有使用者 Query 的請求至 Knowledge Graph API
4. Knowledge Graph API回傳請求之訊息
5. Cloud Functions 把要回傳之訊息打包成 Slack 的格式
6. Cloud Functions 回傳訊息以及圖片
7. 使用者看到回傳結果
事前準備(API Key+ Slack Token)
1. 進入到 APIs & Services
2. 點選 Create Credentials 的 API Key,創建一個 API Key
3. 創建完 API KEY 之後到 Dashborad 啟用 Knowledge Graph API Key
4. 進入到所屬 Slack的 Custom Integration 頁面 https://xxxxx.slack.com/apps/manage/custom-integrations 並點選 Slash Commands
5. 點選左邊的 Add Configuration
6. Choose a command 欄位當中填入 /kg 後送出
7. 送出後,請至頁面下方的 URL填入以下訊息(或是可以部署完 Cloud Functions 再填寫)
//[YOUR_REGION]為使用者部署 Cloud Functions 的 Region
//[YOUR_PROJECT_ID]為使用者的 Project ID
https://[YOUR_REGION]-[YOUR_PROJECT_ID].cloudfunctions.net/kgSearch
8. 回到終端機並創建一個資料夾
$ mkdir ~/gcf_slack
$ cd ~/gcf_slack
部署到 Cloud Functions
- 下載 GCP 的 Node.js sample
- 進到 /nodejs-docs-samples/functions/helloworld/,把 index.js 跟 package.json 複製到剛剛的資料夾
- 創建一個檔案 config.json,並填入以下資訊
{ "SLACK_TOKEN": "[YOUR_SLACK_TOKEN]", //[YOUR_SLACK_TOKEN] 在創立完 Slash command 之後,頁面下方產生的 Token "KG_API_KEY": "[YOUR_KG_API_KEY]" //[YOUR_KG_API_KEY] APIs & Service 裡剛剛創立的 Key value } - 進到 index.js,刪除所有內容並加入以下程式
const config = require('./config.json'); const googleapis = require('googleapis'); const kgsearch = googleapis.kgsearch('v1'); //當發一個 HTTP POST請求給 Cloud Functions 時會觸發 exports.kgSearch = (req, res) => { return Promise.resolve() .then(() => { if (req.method !== 'POST') { const error = new Error('Only POST requests are accepted'); error.code = 405; throw error; } // Verify that this request came from Slack verifyWebhook(req.body); // Make the request to the Knowledge Graph Search API return makeSearchRequest(req.body.text); }) .then((response) => { // Send the formatted message back to Slack res.json(response); }) .catch((err) => { console.error(err); res.status(err.code || 500).send(err); return Promise.reject(err); }); }; // 驗證 Slack token function verifyWebhook (body) { if (!body || body.token !== config.SLACK_TOKEN) { const error = new Error('Invalid credentials'); error.code = 401; throw error; } } //把使用者的請求發送給 Knowledge Graph API function makeSearchRequest (query) { return new Promise((resolve, reject) => { kgsearch.entities.search({ auth: config.KG_API_KEY, query: query, limit: 1 }, (err, response) => { console.log(err); if (err) { reject(err); return; } // Return a formatted message resolve(formatSlackMessage(query, response)); }); }); } //把資料轉換成 Slack 可以顯示的格式 function formatSlackMessage (query, response) { let entity; // Extract the first entity from the result list, if any if (response && response.itemListElement && response.itemListElement.length > 0) { entity = response.itemListElement[0].result; } // Prepare a rich Slack message // See https://api.slack.com/docs/message-formatting const slackMessage = { response_type: 'in_channel', text: `Query: ${query}`, attachments: [] }; if (entity) { const attachment = { color: '#3367d6' }; if (entity.name) { attachment.title = entity.name; if (entity.description) { attachment.title = `${attachment.title}: ${entity.description}`; } } if (entity.detailedDescription) { if (entity.detailedDescription.url) { attachment.title_link = entity.detailedDescription.url; } if (entity.detailedDescription.articleBody) { attachment.text = entity.detailedDescription.articleBody; } } if (entity.image && entity.image.contentUrl) { attachment.image_url = entity.image.contentUrl; } slackMessage.attachments.push(attachment); } else { slackMessage.attachments.push({ text: 'No results match your query...' }); } return slackMessage; } - 進入到 package.json,在 dependencies 區塊加入以下內容
"googleapis": "^19.0.0", -
$ gcloud beta functions deploy kgSearch --trigger-http測試
1. 執行以下指令進行測試
//[YOUR_REGION]為使用者部署 Cloud Functions 的 Region
//[YOUR_PROJECT_ID]為使用者的 Project ID
//[YOUR_SLACK_TOKEN]為Slack的使用 Token

$ curl -X POST "https://[YOUR_REGION]-[YOUR_PROJECT_ID].cloudfunctions.net/kgSearch" -H "Content-Type: application/json" --data '{"token":"[YOUR_SLACK_TOKEN]","text":"giraffe"}' -k
2. 查看 Log 是否成功執行
$ gcloud beta functions logs read --limit 20
3. 在 Slack 的任一頻道送出以下內容,成功送出會顯示長頸鹿的圖片
/kg giraffe
清空資訊
1. 刪除 Cloud Functions 上的資訊
$ gcloud beta functions delete kgSearch
2. Disable 或是刪除剛剛的 Slash command
(原文翻譯 Google Cloud。)

