
很多人都說「無伺服器架構」是雲端運算的下一階段發展,而「無伺服器架構」是來自雲端運算中兩個服務的整合:後端即服務 (BaaS) 和功能即服務 (FaaS)。
藉由 BaaS,我們將應用程式拆解成更小的元件,並使用外部服務來完全部署這些元件。通常是透過 API 調用 (或 gRPC 調用) 所完成,Google 其中一項最受歡迎的後端即服務就是 Firebase,它是一款適用於行動裝置和網頁應用程式的即時資料庫 (具有許多額外厲害的功能)。
另一方面,功能即服務則是雲端運算服務的另一種形式:FaaS 是一種構建和部署伺服器端代碼的方法,只需在供應商提供的 FaaS 平台上部署各種功能 (hence the name)。
介紹完無伺服器架構的定義之後,接著來建構一個完整的「無伺服器應用程式」吧。
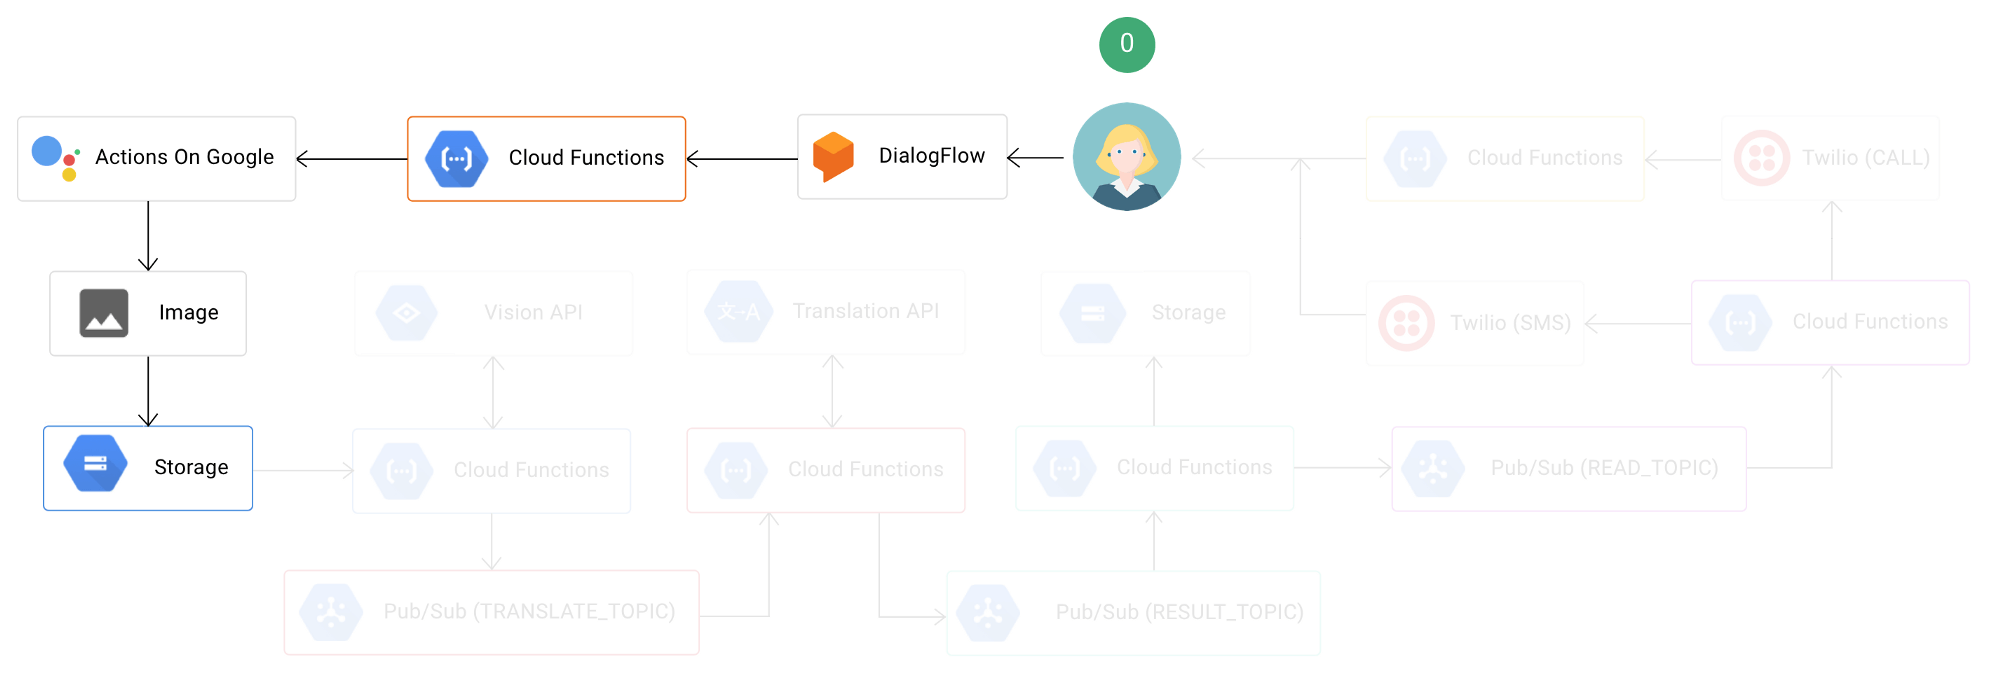
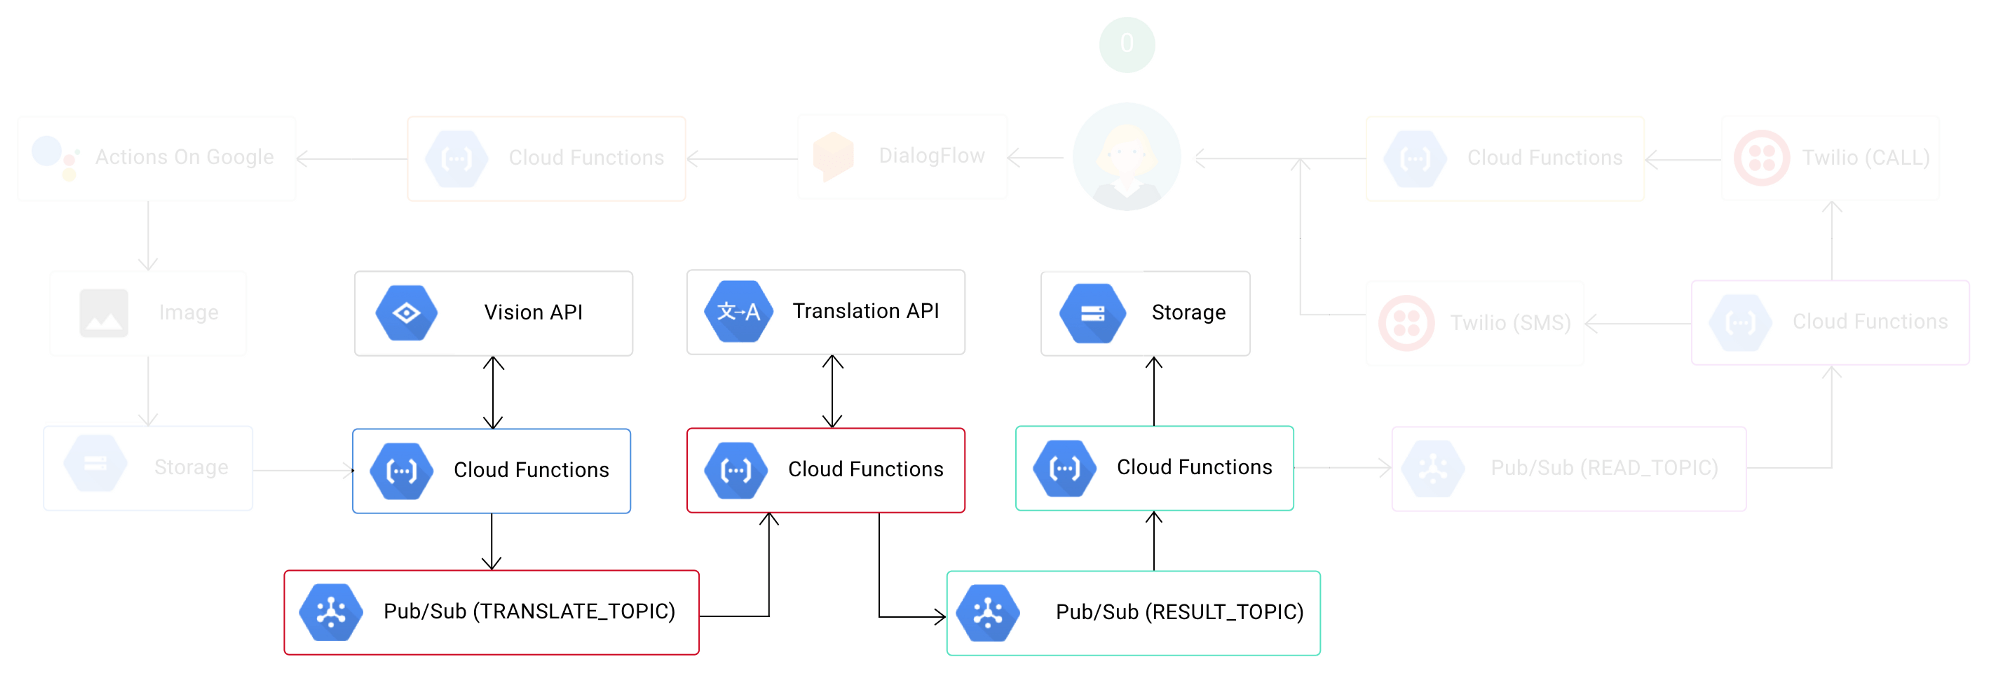
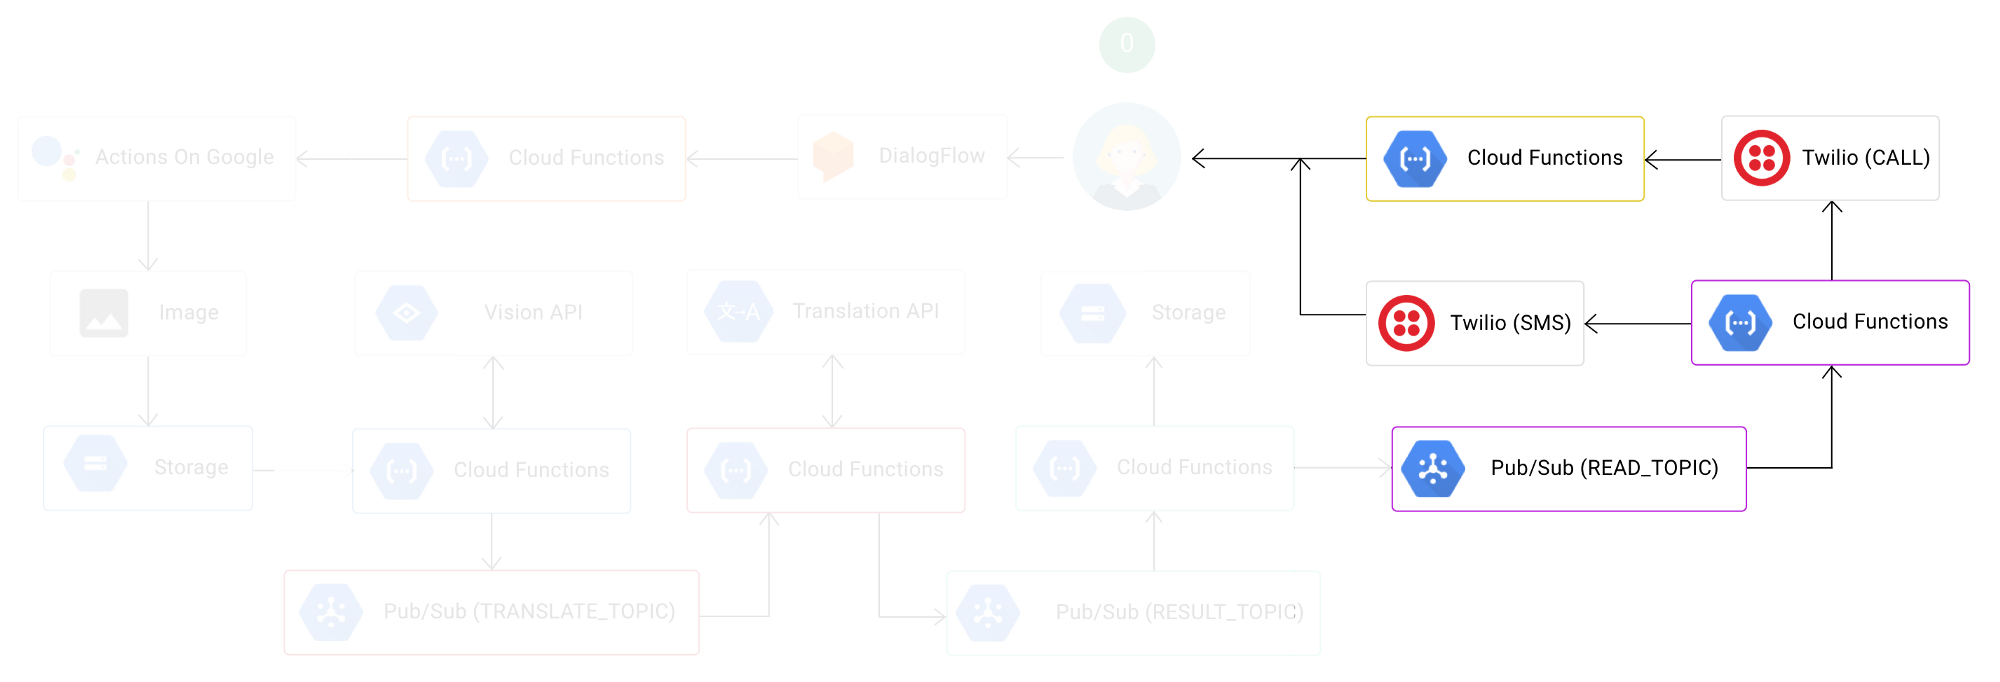
我們要建構的應用程式是一個聊天機器人,它能夠從圖片中讀取文字內容 (可選擇將其翻譯為不同的語言),並通過 SMS 訊息 (或電話) 將結果發送回用戶。這種應用程式可以從圖像甚至視頻流中提取可用的訊息,並將 SMS 通知發送給用戶或群組。
1 – 建立 Chatbot
對於我們的使用案例,我們希望與我們的聊天機器人開始對話並提供一些包含文字訊息的內容以供後續分析 (範例:書籍或報紙的其中一頁)。
a- Creating the “dialog flow” for our agent
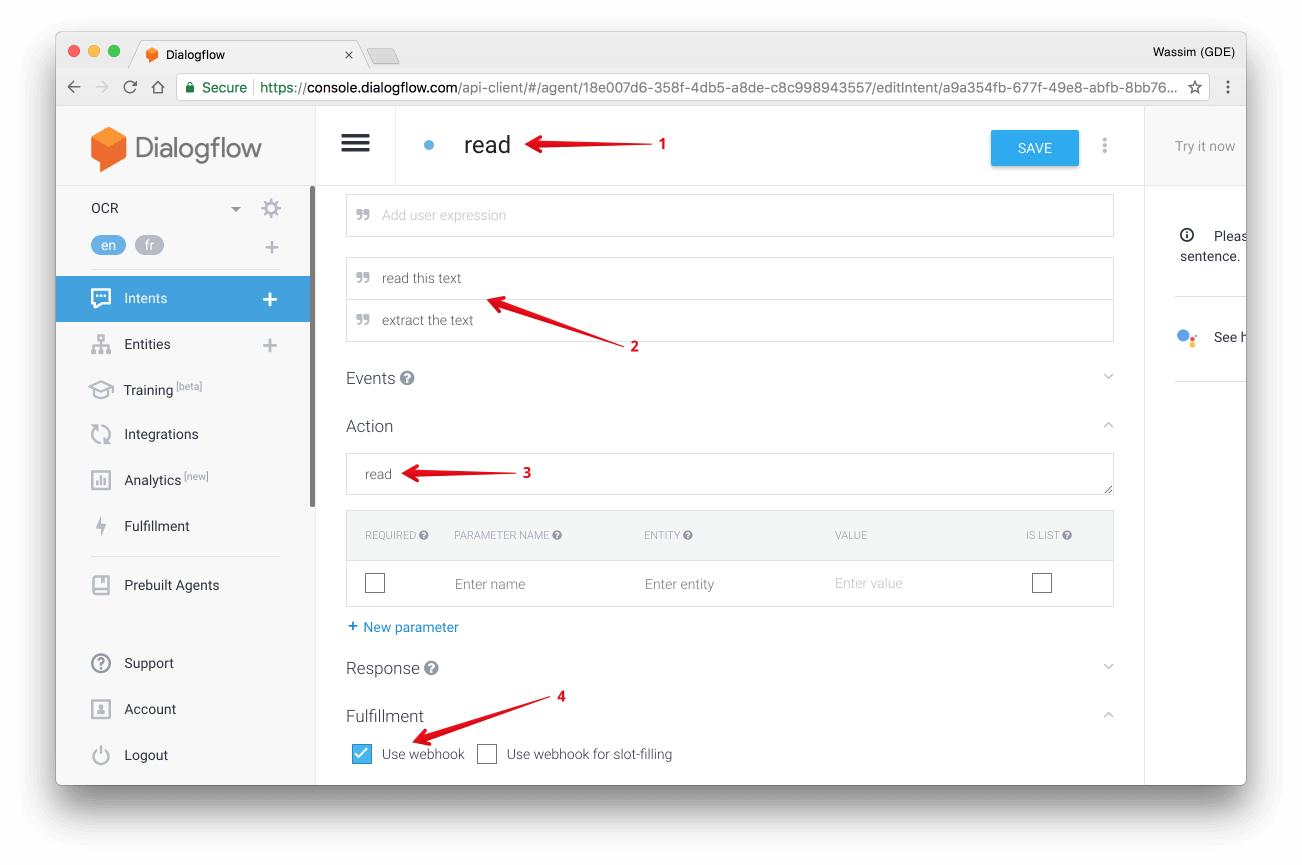
由於「聊天機器人」實作的部分不是我們在這篇文章中的主要內容,因此我們將在 DialogFlow 中設計一個最簡單快速的 dialog,如下所示:
- 建立一個 intent “Read”。
- 添加幾個用戶的句子,例如:“讀取文字內容” 或 “摘錄文字內容”
- 添加一個 “read” 動作
- 啟用 webhook (請參閱下方的實行過程)。
b-實作聊天機器人邏輯
現在讓我們編寫聊天機器人的邏輯,依此將實際拍攝照片。首先,我們需要兩個實用功能:
- captureImage 使用用戶相機拍攝圖像的功能。
- uploadImage 將該圖像上傳到 Google Cloud Storage (GCS) 的功能。
首先是 captureImage 功能函數的實作。此函數使用 MacOS 上的系統函數 imagesnap 來實際使用相機,捕捉圖像並將圖像文件存儲於下方路徑 /tmp/google-actions-reader-${Date.now()}.png 。接著函數會將檔案名稱和內容以以 base64 格式傳回 :
const fs = require('fs');
const child_process = require('child_process');
const Buffer = require('safe-buffer').Buffer;
/**
 * Capture the image from the user computer's camera.
 */
function captureImage() {
  return new Promise((res, rej) => {
    const file = `/tmp/google-actions-reader-${Date.now()}.png`;
    try {
      child_process.execSync(`imagesnap -w 1 ${file}`);
      const bitmap = fs.readFileSync(file);
      res({
        base64: new Buffer(bitmap).toString('base64'),
        file
      });
    } catch (err) { rej(err); }
  });
}
下一個功能函數 uploadImage 則將該圖像簡單地上傳到 GCS 中的儲存分區(bucket)cloud-function-ocr-demo__image:
const child_process = require('child_process');
/**
 * Uploads the file to GCS.
 *
 * @param {object} data The GCP payload metadata.
 * @param {object} data.file The filename to read.
 */
function uploadImage(data) {
  child_process.execSync(
    `gsutil cp ${data.file} gs://cloud-function-ocr-demo__image`
  );
  return data.file.split('/').pop();
}
請注意該儲存分區(bucket)的名稱cloud-function-ocr-demo__image,我們稍後將需要它。
現在我們準備好了兩個功能函數 captureImage 並 uploadImage,讓我們在 intent 中的讀取 (READ) 邏輯使用它們 (請記住上面 dialog 中的這個 intent):
/**
 * The "read" intent that will trigger the capturing and uploading
 * the image to GSC.
 *
 * @param {object} app DialogflowApp instance object.
 */
function readIntent(app) {
  captureImage()
    .then(uploadImage)
    .then(content => {
      app.tell(`I sent you an SMS with your content.`);
    })
    .catch(e => app.ask(`[ERROR] ${e}`) );
}
readIntent 將會截取照片並且上傳到 GCS。
現在我們已經完成了聊天機器人的所有邏輯,接下來我們要建立一個主要的 Cloud Functions 來處理 DialogFlow 的請求:
const aog = require('actions-on-google');
const DialogflowApp = aog.DialogflowApp;
/**
 * Handles the agent (chatbot) logic. Triggered from an HTTP call.
 *
 * @param {object} request Express.js request object.
 * @param {object} response Express.js response object.
 */
module.exports.assistant = (request, response) => {
  const app = new DialogflowApp({ request, response });
  const actions = new Map();
  actions.set('read', readIntent);
  app.handleRequest(actions);
};
上面程式碼有個 function 名稱為 assistant,會需要透過 HTTP 請求來觸發。當使用者在在聊天室輸入文字時,HTTP 請求用將由 DialogFlow 執行,例如:「閱讀文字」(如上所述) 是讀取 intent 中定義的表達式。
c-部署輔助的 Cloud Functions
本章節將為本指南提供其他的範例。
為了部署 Cloud Functions,我們可以使用 gcloud 命令附帶有以下的參數:
gcloud beta functions
  deploy [function-label]
  [trigger-type]
  --source [source-code]
  --entry-point [function-name]
- <function-label> 是一個功能函數標籤,和 <function-name> 相似但有些許不同。
- <trigger-type> 是你的功能將如何被觸發 (topic,http,storage 等)。
- <source-code> 是指原始碼託管放置於 Google Cloud 代碼庫的位置。此處不得為其他公開的 Git 代碼庫的位置!
- <function-name> 是實際輸出的功能函數名稱 (在您的代碼中)。
*註1:您還可以使用 Google 雲端儲存分區 (bucket) 託管您的功能函數原始碼。但我們不會在此指南介紹。
*註2:如果您的組織中有持續部署方式 (continuous delivery),那麼將您的原始碼託管在 Google 雲端代碼庫 (a Git repo) 中是個不錯的主意。
以下是我們範例中完整的命令:
gcloud beta functions
  deploy ocr-assistant
  --source https://source.developers.google.com/projects/...
  --trigger-http
  --entry-point assistant
如果您想知道更詳細,Google Cloud 代碼庫中的原始碼位址格式如下:
https://source.developers.google.com/projects//repos//moveable-aliases/
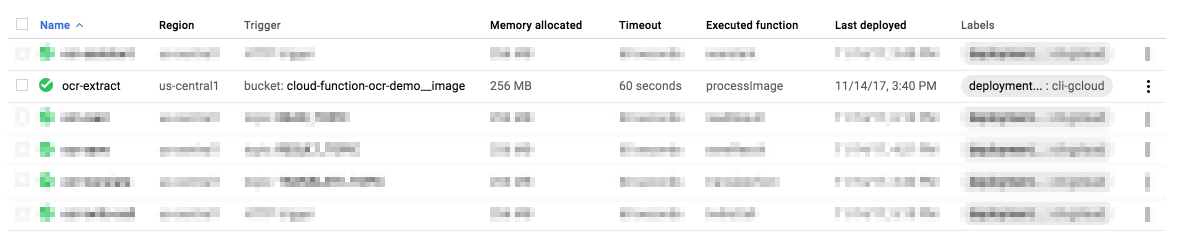
一旦部署完畢,您的功能函數應該準備完成等待觸發:
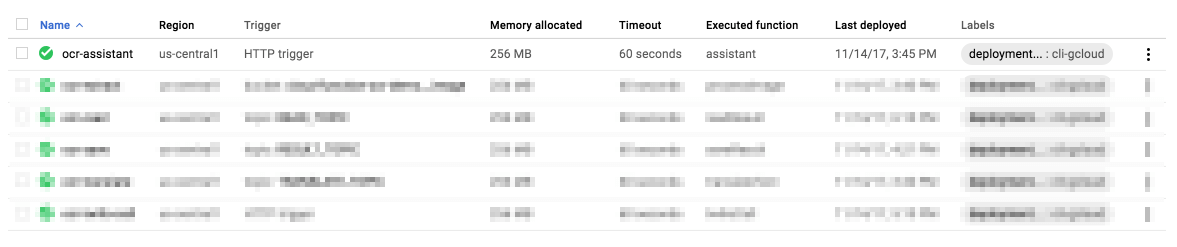
您還將獲得一個公開的 URL,如下所示:
https://us-central1-.cloudfunctions.net/ocr-assistant
這是我們將在 DialogFlow 項目中使用的 URL。
如果你有仔細閱讀,你可能會注意到 captureImage 功能函數需要使用相機,這意味著我們無法將此特定功能部署到 Google 雲端平台。相反,我們會將其託管在我們的特定硬體上,例如 Raspberry PI (to make it simple),並使用不同的 URL。
您可以使用 Google Cloud Function Emulator 在本地運行您的雲端函數。請記住,這僅用於開發目的。不要將其用於實際的應用程式。
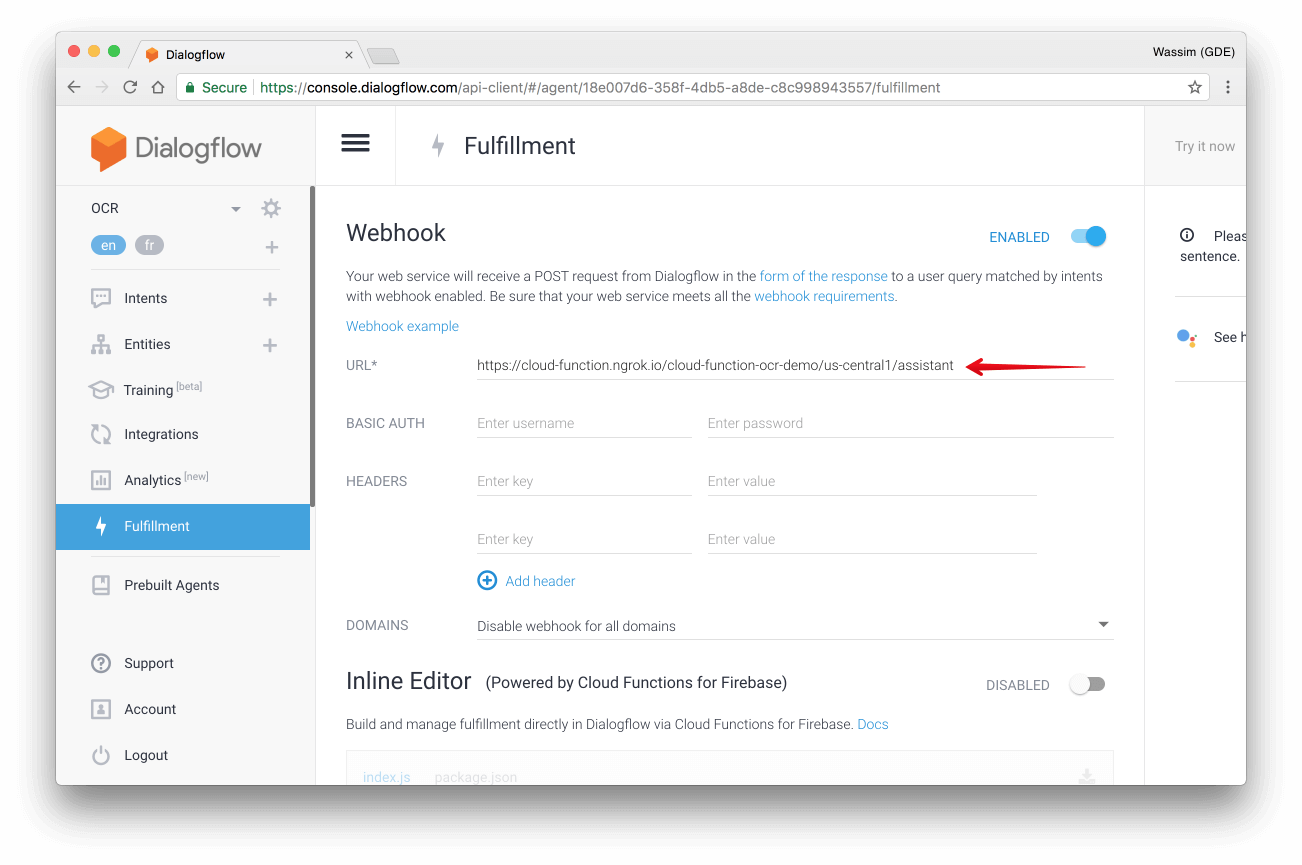
d-添加實際運行網址
接著添加實際運行的 URL,它指向 Cloud Functions 中的 assistant 將處理聊天機器人的請求:
現在,我們完成了應用程式的第一部分,主要內容包括將圖像上傳到 GCS。
2-處理圖像
到目前為止,我們只討論了 Cloud Functions – FaaS 的部分。讓我們跳轉到後端即服務 (BaaS) 的部分。
在我們的範例中,我們希望能夠從圖像中摘錄出一些文字內容。我們有大量的開源函式庫來做到這一點,簡單舉幾個例子,如:OpenCV 或 Tensorflow。但是運行這些開源函式庫,我們會需要擁有機器學習和圖像 (或聲音) 處理方面的專家,而這並不容易。此外,在理想情況下,我們並不想管理這個功能,不希望維護此代碼,也希望能夠在應用程式受歡迎後有能力自動擴展。幸運的是,Google 雲端平台給了我們以下支援:
- 在 Google Vision API 中允許我們摘錄內容。
- 使用 Google Translation API 可以協助我們翻譯內容。
以下是此功能的子結構:
a-從圖像中摘錄內容
為了能夠處理圖像,我們需要兩個功能:
- processImage 每當新圖像上傳到 GCS 中的儲存分區 (bucket) cloud-function-ocr-demo__image 時,都會觸發 Cloud Functions。
- detectText 該功能將使用 Google Vision API 從圖像中實際摘錄文字內容。
processImage 執行過程如下:
/**
 * Cloud Function triggered by GCS when a file is uploaded.
 *
 * @param {object} event The Cloud Functions event.
 * @param {object} event.data A Google Cloud Storage File object.
 */
exports.processImage = function processImage(event) {
  let file = event.data;

  return Promise.resolve()
    .then(() => {
      if (file.resourceState === 'not_exists') {
        // This was a deletion event, we don't want to process this
        return;
      }

      return detectText(file.bucket, file.name);
    })
    .then(() => {
      console.log(`File ${file.name} processed.`);
    });
};
detectText功能函數的實作很簡單 (我們稍後會改進它):
const vision = require('@google-cloud/vision')();
/**
 * Detects the text in an image using the Google Vision API.
 *
 * @param {string} bucketName Cloud Storage bucket name.
 * @param {string} filename Cloud Storage file name.
 */
function detectText(bucketName, filename) {
  let text;

  return vision
    .textDetection({
      source: {
         imageUri: `gs://${bucketName}/${filename}`
      }
    })
    .then(([detections]) => {
      const annotation = detections.textAnnotations[0];
      text = annotation ? annotation.description : '';
      return Promise.resole(text);
    });
}
我們現在需要部署 processImage Cloud Function,並且希望在新圖像上傳到 GCS 中的儲存分區 (bucket) cloud-function-ocr-demo__image 時觸發它。
gcloud beta functions
   deploy ocr-extract
   --source https://source.developers.google.com/projects/...
   --trigger-bucket cloud-function-ocr-demo__image
   --entry-point processImage
接著,我們需要加入一些翻譯。
b-翻譯文字內容
翻譯摘錄出的文字將由特定的 Google Cloud Pub/Sub 主題觸發 TRANSLATE_TOPIC,它將包含兩項操作:
- 檢測摘錄出的內容所屬的語言。我們將於先前的 processImage 功能中執行此操作。我們可以為此建立另一個 Cloud Functions,但不要讓我們的架構過於復雜!
- translateText :將該內容轉換為給定的語言。
使用語言檢測功能來改進我們現有的 processImage Cloud Functions:
const vision = require('@google-cloud/vision')();
const translate = require('@google-cloud/translate')();
const config = require('./config.json');
/**
 * Detects the text in an image using the Google Vision API.
 *
 * @param {string} bucketName Cloud Storage bucket name.
 * @param {string} filename Cloud Storage file name.
 * @returns {Promise}
 */
function detectText(bucketName, filename) {
  let text;

  return vision
    .textDetection({
      source: {
         imageUri: `gs://${bucketName}/${filename}`
      }
    })
    .then(([detections]) => {
      const annotation = detections.textAnnotations[0];
      text = annotation ? annotation.description : '';
      return translate.detect(text);
    })
    .then(([detection]) => {
      if (Array.isArray(detection)) {
        detection = detection[0];
      }

      // Submit a message to the bus for each language
      // we're going to translate to
      const tasks = config.TO_LANG.map(lang => {
        let topicName = config.TRANSLATE_TOPIC;
        if (detection.language === lang) {
          topicName = config.RESULT_TOPIC;
        }
        const messageData = {
          text: text,
          filename: filename,
          lang: lang,
          from: detection.language
        };

        return publishResult(topicName, messageData);
      });

      return Promise.all(tasks);
    });
}
讓我們來解釋我們額外新添加的代碼:
我們首先添加了對 Google Translation API 的調用,用 translate.detect(text);檢測摘錄文字的主要語言。然後,在下一個區塊中,基本上遍訪配置文件中的 config.TO_LANG 陣列中的每一個元素,並發布一個 TRANSLATE_TOPIC 包含文字內容 (text),來源語言 (from) 和我們想要翻譯的目標語言的特定有效內容 (lang) 。如果來源語言與目標語言相同,我們只發布 RESULT_TOPIC。
Google Cloud Pub / Sub 的備註
為了方便起見,我們還包括一個新的實用功能,publishResult 它負責發布 Pub / Sub主題 (topic)。它主要使用 Google Cloud Pub / Sub API 建立 (如果需要) 並發布給定主題:
const pubsub = require('@google-cloud/pubsub')();
/**
 * Publishes the result to the given pub-sub topic.
 *
 * @param {string} topicName Name of the topic on which to publish.
 * @param {object} data The message data to publish.
 */
function publishResult(topicName, data) {
  return pubsub
    .topic(topicName)
    .get({ autoCreate: true })
    .then(([topic]) => topic.publish(data));
}
接下來我們建立一個 translateText Cloud Function 來翻譯摘錄出的文字:
const translate = require('@google-cloud/translate')();
const Buffer = require('safe-buffer').Buffer;
const config = require('./config.json');
/**
 * Translates text using the Google Translate API.
 * Triggered from a message on a Pub/Sub topic.
 *
 * @param {object} event The Cloud Functions event.
 * @param {object} event.data The Cloud Pub/Sub Message object.
 * @param {string} event.data.data The "data" property of
 *    the Cloud Pub/Sub Message.
 *    This property will be a base64-encoded string that
 *    you must decode.
 */
exports.translateText = function translateText(event) {
  const pubsubMessage = event.data;
  const jsonString = Buffer.from(
                       pubsubMessage.data, 'base64'
                     ).toString();
  const payload = JSON.parse(jsonString);

  return Promise.resolve()
    .then(() => {

      const options = {
        from: payload.from,
        to: payload.lang
      };

      return translate.translate(payload.text, options);
    })
    .then(([translation]) => {
      const messageData = {
        text: translation,
        filename: payload.filename,
        lang: payload.lang
      };

      return publishResult(config.RESULT_TOPIC, messageData);
    });
};
這個函數的實作是一目了然的:我們會調用 translation.translate(payload.text, options); 一旦我們得到結果,我們就發布翻譯後的內容為 RESULT_TOPIC。
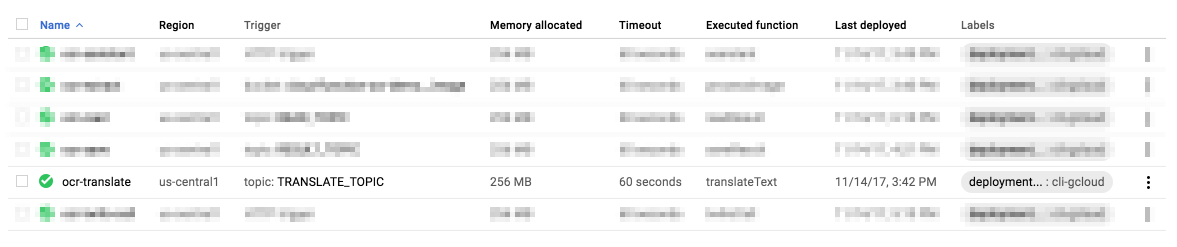
現在是時候使用與以前相同的命令部署 translateText Cloud Function 了。該功能將由 TRANSLATE_TOPIC 主題觸發,因此我們需要使用「主題」作為觸發型態:
gcloud beta functions
   deploy ocr-translate
   --source https://source.developers.google.com/projects/...
   --trigger-topic TRANSLATE_TOPIC
   --entry-point translateText
c-保存翻譯後的文字
到目前為止,我們現在已經設法捕捉圖像,將其上傳到 GCS,處理它並摘錄出文字且進行翻譯。最後一步是將翻譯後的文字存回 GCS。
以下為此功能函數的實作:
const storage = require('@google-cloud/storage')();
const Buffer = require('safe-buffer').Buffer;
const config = require('./config.json');
/**
 * Saves the data packet to a file in GCS.
 * Triggered from a message on a Pub/Sub topic.
 *
 * @param {object} event The Cloud Functions event.
 * @param {object} event.data The Cloud Pub/Sub Message object.
 * @param {string} event.data.data The "data" property of
 *    the Cloud Pub/Sub Message.
 *    This property will be a base64-encoded string that
 *    you must decode.
 */
exports.saveResult = function saveResult(event) {
  const pubsubMessage = event.data;
  const jsonString = Buffer.from(
                       pubsubMessage.data, 'base64'
                     ).toString();
  const payload = JSON.parse(jsonString);

  return Promise.resolve()
    .then(() => {
      const bucketName = config.RESULT_BUCKET;
     // Appends a .txt suffix to the image name.
     const filename = renameFile(payload.filename, payload.lang);

      const file = storage.bucket(bucketName).file(filename);

      return file.save(payload.text)
        .then(_ => publishResult(config.READ_TOPIC, payload));
    });
};
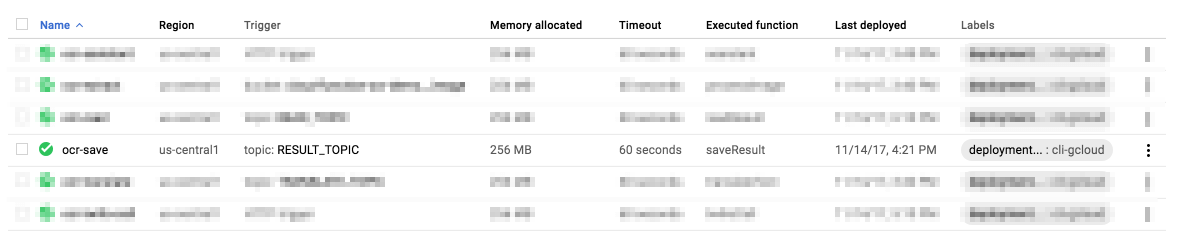
saveResult 是由 RESULT_TOPIC 持有翻譯文本的主題觸發的。我們只需使用該有效內容並調用 Google Cloud Storage API 將內容儲存在名為 config.RESULT_BUCKET (即 cloud-functions-orc-demo) 的儲存分區 (bucket) 中。一旦完成,我們發布該 READ_TOPIC 主題並觸發下一個 Cloud Functions (請參閱下一節)。
來到部署 saveResult Cloud Function 的時間,使用與先前相同的命令來部署。該功能將由 TRANSLATE_TOPIC 主題觸發,因此我們也需要使用「主題」作為觸發型態:
gcloud beta functions
   deploy ocr-save
   --source https://source.developers.google.com/projects/...
   --trigger-topic RESULT_TOPIC
   --entry-point saveResult
3-發送 SMS 訊息通知
最後,現在我們準備從 GCS 讀取翻譯後的文字內容,並通過 SMS 發送至用戶的手機。
a-從 GCS 讀取翻譯後的文字內容
從 GCS 讀取文件同樣是個簡單的操作:
const Buffer = require('safe-buffer').Buffer;
/**
 * Reads the data packet from a file in GCS.
 * Triggered from a message on a Pub/Sub topic.
 *
 * @param {object} event The Cloud Functions event.
 * @param {object} event.data The Cloud Pub/Sub Message object.
 * @param {string} event.data.data The "data" property of
 *    the Cloud Pub/Sub Message.
 *    This property will be a base64-encoded string that
 *    you must decode.
 */
exports.readResult = function readResult(event) {
  const pubsubMessage = event.data;
  const jsonString = Buffer.from(
                       pubsubMessage.data, 'base64'
                     ).toString();
  const payload = JSON.parse(jsonString);
  return Promise.resolve()
    .then(() => readFromBucket(payload))
    .then(content => sendSMS(content).then(_ => call(content)));
};
在 readResult 功能函數中,我們會用到另一個工具程式的函數 readFromBucket,顧名思義,它從給定的 GCS 儲存分區 (bucket) 中讀取內容。以下是詳細的實作過程:
const storage = require('@google-cloud/storage')();
const config = require('./config.json');
/**
 * Reads the data packet from a file in GCS.
 * Triggered from a message on a Pub/Sub topic.
 *
 * @param {object} payload The GCS payload metadata.
 * @param {object} payload.filename The filename to read.
 */
function readFromBucket(payload) {
  // Appends a .txt suffix to the image name.
  const filename = renameFile(payload.filename, payload.lang);
  const bucketName = config.RESULT_BUCKET;
  const file = storage.bucket(bucketName).file(filename);
  const chunks = [];

  return new Promise((res, rej) => {
    file
      .createReadStream()
      .on('data', chunck => {
        chunks.push(chunck);
      })
      .on('error', err => {
        rej(err);
      })
      .on('response', response => {
        // Server connected and responded with
        // the specified status and headers.
      })
      .on('end', () => {
        // The file is fully downloaded.
        res(chunks.join(''));
      });
  });
}
接著讓我們部署 readResult Cloud Function 並使其從 READ_TOPIC 主題中觸發:
gcloud beta functions
   deploy ocr-read
   --source https://source.developers.google.com/projects/...
   --trigger-topic READ_TOPIC
   --entry-point readResult

b-發送 SMS 訊息通知
當來到發送 SMS 訊息至用戶手機上的階段時,我們採用一款厲害的服務 Twilio。
*註:欲使用Twilio服務,需要您建立一個開發者帳戶。
const Twilio = require('twilio');
const TwilioClient = new Twilio(
   config.TWILIO.accountSid,
   config.TWILIO.authToken
);
/**
 * Sends an SMS using Twilio's service.
 *
 * @param {string} body The content to send via SMS.
 */
function sendSMS(body) {
  return TwilioClient.messages
    .create({
      to: '+33000000000',
      from: '+33000000000',
      body: body || 'MESSAGE NOT FOUND'
    });
}
c-撥打電話(BONUS)
通過電話向用戶回送翻譯的內容有點棘手,因為您需要提供兩個 function:
- 「call」這個 function 用於實際上撥打電話呼叫用戶。
- 「twilloCalls」這個 function 為一個 HTTP 接口, 負責處理由 “call” function 所發送請求。
為了演示這個過程如何進行,我們先來看看 twilioCalls 實行如下:
const Twilio = require('twilio');
const VoiceResponse = Twilio.twiml.VoiceResponse;
/**
 * Handles the incoming Twilio call request.
 * Triggered from an HTTP call.
 *
 * @param {object} request Express.js request object.
 * @param {object} response Express.js response object.
 */
module.exports.twilioCall = function(request, response) {
  return readFromBucket({
    filename: 'twilio_user_33000000000.txt'
  }).then(content => {
    const twiml = new VoiceResponse();
    twiml.say(`
    Hi, this is your extracted text:

    ${content}
    `);
    res.writeHead(200, { 'Content-Type': 'text/xml' });
    res.end(twiml.toString());
  });
};
twilioCall 功能函數負責從儲存分區 (bucket) 中讀取文件,並經由 Twilio Markup Language (TwilioML) 建立 XML 格式的回應。
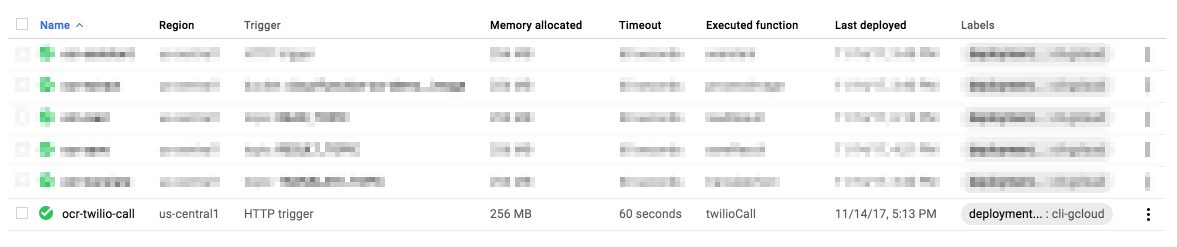
然後,您需要部署此 Cloud Function 以獲取該 call 功能函數所需的公開 URL :
gcloud beta functions
   deploy ocr-twilio-call
   --source https://source.developers.google.com/projects/...
   --trigger-http
   --entry-point twilioCall
部署完成後,您將獲得如下所示的公開 URL:
https://us-central1-.cloudfunctions.net/ocr-twilio-call
接下來,我們將在該 call 函數中使用該 URL:
/**
 * Triggers a call using Twilio's service.
 */
function call() {
  return TwilioClient.api.calls
    .create({
      url: 'https://the-url-from-above/ocr-twilio-call',
      to: '+33000000000',
      from: '+33000000000'
    });
}
完成!現在,您的 Twilio HTTP 端已準備好接聽來電。
總結!在本指南中,我們實行了一組 Cloud Functions 執行不同任務:
- assistant 處理來自 DialogFlow 的聊天機器人請求。
- processImage 從上傳的圖像中摘錄出文字內容。
- translateText 將摘錄出的文字翻譯成不同的語言。
- saveResult 將翻譯後的文字內容保存到 GCS。
- readResult 從儲存在 GCS 中的文件裡讀取翻譯後的文字內容。
- twilioCall 處理來電請求。
以下為所有已部署的 Cloud Functions 重點總結:


試試看
為了測試應用程式,首先我們需要部署 DialogFlow 聊天機器人。我們選擇將其部署到 Google Assistant,因為我們的 assistant Cloud Function 主要在處理 Google 智能助理請求。如果你想部署到其他服務 (Slack,Facebook,Twitter 等),你就需要提供和部署其他 Google Assistant。
於按鈕選項列中選擇 Google Assistant,接著點擊 TEST 按鈕
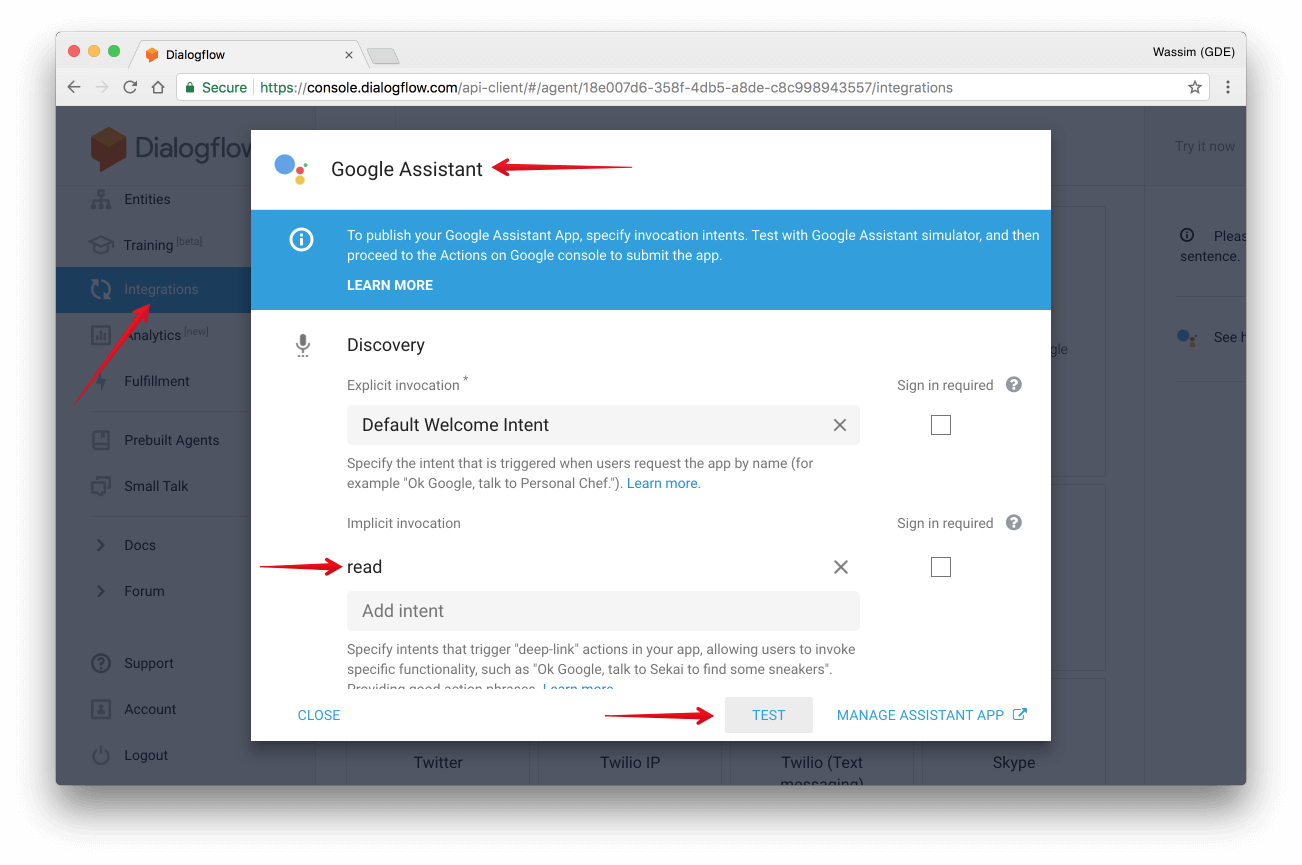
這將在 Google 模擬器上打開 Actions,允許您直接在瀏覽器中測試您的聊天機器人。或者,您也可以使用手機或 Google Home 設備:

同時給我們的聊天機器人一個名字吧,範例:莎士比亞。從模擬器的總覽面板中可以完成這項工作。
做為演示範例,我們將加入以下的引用 (由 Ziad K. Abdelnour 撰寫):

而且這是由我們的 readResult 功能發送的 SMS 訊息:

以下是完整的原始碼:https://github.com/manekinekko/serverless-application-demo
恭喜您剛剛建構完畢一個真正的“無伺服器架構”應用程式!
(原文翻譯此。)