[手把手教學] 如何讓 GCP HTTPS load balancer 使用 Let’s encrypt SSL 憑證與自動更新
Let’s Encrypt 成立宗旨在透過免費提供 SSL 憑證讓每個網站都能使用 HTTPS 加密, 不用為 SSL 憑證付費煩惱, 加上之前 Google search 表示調高使用 HTTPS 網站權重 , 越來越多的網站由 HTTP 轉換至 HTTPS 服務, 若您的網站架設在單一伺服器或者執行個體, 請參考 https://letsencrypt.tw/ 進行安裝設定與更新, 本文分享以 Google Cloud Platform HTTP(S) Load Balancing 提供服務且(計畫)使用 Let’s Encrypt SSL 憑證並透過gcloud SDK 完成自動更新憑證。
準備環境
新建或使用現有的執行個體, 已安裝 web serve 並有 IAM Network Admin 與 Security Admin 權限或更高之帳號或 Service Account (instance 規格 : Micro , 作業系統 : Debian)
GCP HTTP 負載平衡器 load balancer : web (範例名稱)
GCP HTTPS 負載平衡器 load balancer : web-https (範例名稱)
需要簽署憑證的網域名稱 : web.gcp.expert, ssl.gcp.expert (範例網址)
Step 1
建立執行個體群組 (instance group) web-le 將執行個體 instance 加入
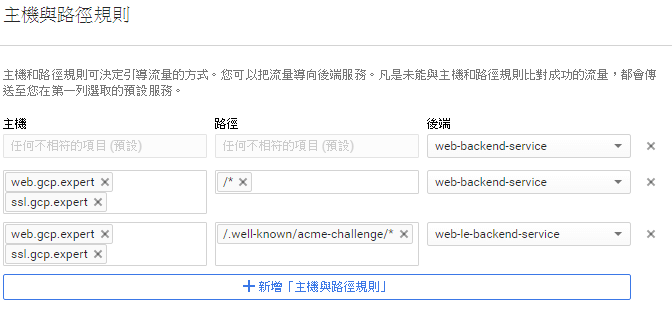
於 HTTP load balacer 設定中新增後端服務 (backend service) 加入 backend group web-le , 於主機與路徑規則 (Host and path rules) 增加設定符合網址路徑 /.well-known/acme-challenge/ 的要求, 送往此後端服務 (backend service), 範例名稱為 web-le-backend-service

Step 2
下載與安裝 dehydrated (舊名letsencrypt.sh) (參考 https://letsencrypt.tw/ ), dehydrated 使用的系統需求相對低, 僅需 curl 與 openssl
Step 3
編輯 config, 因 GCP SSL 憑證僅支援 RSA-2048 與 ECDSA P-256 加密, 在 config 中設定
WELLKNOWN=/var/www/letsencrypt
KEYSIZE=2048
編輯 domains.txt 加入所需要簽屬憑證的網域名稱, 同一個憑證可多簽署多個同網域名稱, 編寫於同一行, 以空白為間隔
web.gcp.expert ssl.gcp.expert
Step 4
執行 dehydrated 進行憑證簽屬認證
$ sudo /etc/dehydrated/dehydrated -c
# INFO: Using main config file /etc/dehydrated/config
+ Generating account key...
+ Registering account key with letsencrypt...
Processing web.gcp.expert with alternative names: ssl.gcp.expert
+ Signing domains...
+ Creating new directory /etc/dehydrated/certs/web.gcp.expert ...
+ Generating private key...
+ Generating signing request...
+ Requesting challenge for web.gcp.expert...
+ Requesting challenge for ssl.gcp.expert...
+ Responding to challenge for web.gcp.expert...
+ Challenge is valid!
+ Responding to challenge for ssl.gcp.expert...
+ Challenge is valid!
+ Requesting certificate...
+ Checking certificate...
+ Done!
+ Creating fullchain.pem...
+ Done!
Step 5
於goolgle cloud console 或者 gcloud command line 新增 SSL 憑證
sudo gcloud compute ssl-certificates create web-ssl-cert \
  --certificate /etc/dehydrated/certs/web.gcp.expert/fullchain.pem \
  --private-key /etc/dehydrated/certs/web.gcp.expert/privkey.pem

Step 6
於 google cloud console 或者 gcloud command line 啟用 HTTPS load balacnce 中新的 SSL 憑證
gcloud compute target-https-proxies update web-https-target-proxy \
  --ssl-certificate web-ssl-cert

Step 7
Let’s encrypt SSL 憑證有效期限為90天, 到期前需要完成憑證更新, 可透過 cron job 執行 dehydrated 更新憑證, 完成後執行以下指令新增GCP SSL憑證與替換新憑證,達到全自動化更新
# 新增SSL憑證 (命名加入日期)
gcloud compute ssl-certificates create web-ssl-cert-$(date +%Y-%m-%d) \
  --certificate /etc/dehydrated/certs/web.gcp.expert/fullchain.pem \
  --private-key /etc/dehydrated/certs/web.gcp.expert/privkey.pem
# 於GCP Load balancing啟用新SSL憑證
gcloud compute target-https-proxies update web-https-target-proxy \
  --ssl-certificates web-ssl-cert-$(date +%Y-%m-%d)